1. Shopify architecture
1.1. Shopify
Shopify is a commerce platform that allows anyone to set up a store and sell products.
Site owner (merchant) doesn’t need to own neither hosting nor domain. Shopify provides all.
Developers can build:
- Themes to customize store’s appearance.
- Applications (plugins) to customize store’s behaviours.
1.2. Shopify public application
This type of application is written by the third-party developer. Can be installed on any store. After install, the application holds an access_token of that store, which is needed to make API request to store’s resources (products, orders, customers…).
Each public application defines 2 public URLs.
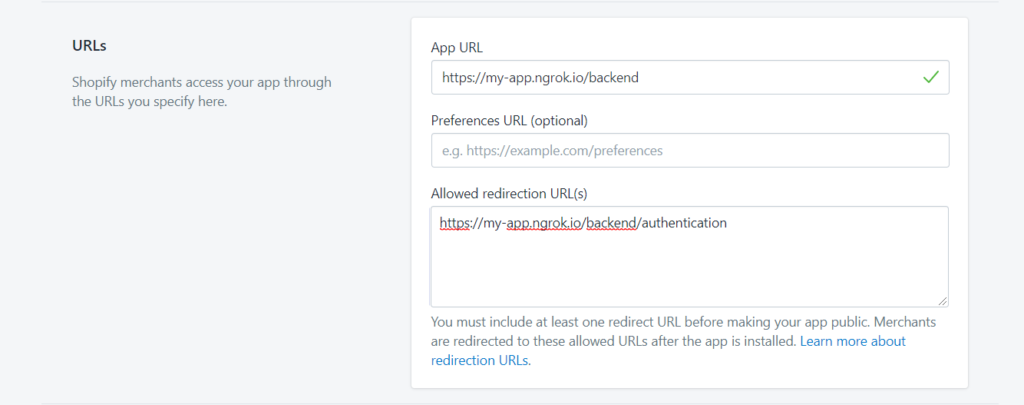
- Allowed redirection URL(s): Used for Oauth authentication during installation.
- App URL: Main URL of the application.

In store’s admin interface, Shopify loads application inside iframe, using its App URL.

Because of this design, app developer must prepare a server to serve his application, unlike other e-commerce systems (WordPress, PrestaShop, …). This way, developer protects app’s code and database; easier debugging, updating and distribution.
Developer can use any language to build the app. In this article, we choose React as frontend and PHP as backend, because:
- We used PHP for years (despite NodeJs works nicer with React).
- Shopify has its own set of React components: Polaris.
- Polaris provides consistent experience while using the application, like other built-in parts of Shopify, makes the app looks officially.
- Use
create-react-appto run an independent React application. This is the easiest way to create a React app.
2. The goals
So far, we have 2 independent applications: Backend (PHP with any framework) and Frontend (React by `create-react-app`).
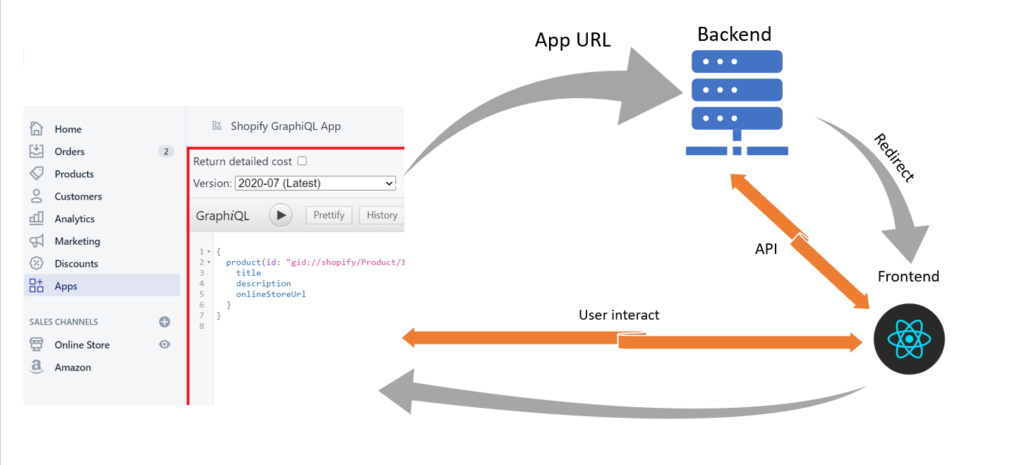
We’ll implement Shopify public application with below flow:
App URLcalls to PHP backend, here we handle Shopify request: detect store, validate installation status, access Shopify AdminRest APIs…- Backend redirects to React, bring all necessary info. React will be displayed in Shopify admin interface.
- React communicates with backend through API.

3. Problems with our design
1. Does it save to redirect Shopify requests from PHP to React?
2. PHP and React are 2 separate applications, but they must run on the same domain for some features to work correctly (toast…). How to serve backend + frontend in only 1 domain?

3. How to expose that domain to internet, under SSL (Shopify requires)?
4. Solve problems
4.1. Redirect from backend to frontend
Normal request from Shopify to app is nothing special. It only contains 5 query parameters:
"hmac": "ae043f1b58949762c78ab968223bd51b54f50d48887d13609c0a8ac99ec4f1e2",
"locale": "en-US",
"session": "467bba8be490992dcfe0ed99a44361fd0ec801eb8a0c7ecc9ccb8b9191b024f0",
"shop": "store-name.myshopify.com",
"timestamp": "1598501933"
Easy to redirect. After do validation on backend, we can safely make a redirect to frontend, carries all those parameters.
This is solved!
4.2. Serve backend & frontend on same domain
By using webserver proxy, we can route all requests from a domain to another domain internally.
Assume we have backend app at http://backend.local, frontend app at http://frontend.local, final domain to serve both backend & frontend at http://app.local.
app.local/backend    --->    backend.local
app.local            --->    frontend.local
Complete example:
- Apache2
<VirtualHost *:80>
    ServerName app.local
    ServerAlias www.app.local

    ProxyPass /backend/ http://backend.local/
    ProxyPassReverse /backend/ http://backend.local/

    ProxyPass / http://frontend.local/
    ProxyPassReverse / http://frontend.local/
</VirtualHost>
- Nginx:
server {
    listen 80;
    index index.php index.html index.htm;
    server_name app.local;

    location /backend {
            proxy_pass http://backend.local;
    }
    location / {
            proxy_pass http://frontend.local;
    }
}
This is solved!
4.3. Expose SSL domain
Ngrok is a simple but powerful solution. Just make a simple configuration file ngrok.yml:
tunnels:
  first-app:
    proto: http
    addr: app.local             # forwarding target
    host_header: rewrite        # rewrite HOST (header line) to forwarding address
    subdomain: my-app           # create real domain at http(s)://my-app.ngrok.io
    inspect: true               # enable inspecting all incoming requests
                                  to http(s)://my-app.ngrok.io
                                  at web interface http://localhost:4040
  second-app:
    ...
    ...
Then run all the tunnels: ngrok start --all, you’ll get this similar result:

Ngrok exposes our localhost app.local into 2 domains: SSL and non-SSL. Of course, we will use the SSL one due to Shopify’s requirement.
Here is the final URLs mapping:
https://my-app.ngrok.io/backend   --->   http://app.local/backend   --->   http://backend.local
https://my-app.ngrok.io/          --->   http://app.local           --->   http://frontend.local
This is solved as well!
Use https://my-app.ngrok.io/backend... for your app’s App URL.
Recap
That’s all for the first step of setting up environment.
Further development is straightforward. Polaris is just a set of predefined React components and quite comfortable to work with.
Happy coding!
